How to take ScreenShot on Windows 10 PC (Computer/Laptop) - Shikshaglobe
How to take Screen Shot on Windows 10 PC
Taking a screenshot on a Windows 10 PC or laptop is a simple
and useful skill that allows you to capture and save images of your screen
quickly. Whether you want to capture an error message, save an image from the
internet, or create a tutorial, Windows 10 offers several methods to take
screenshots. In this guide, we will walk you through various ways to capture
screenshots on your Windows 10 computer or laptop.
Table of Contents
1. Introduction
2. How to Take a
Full-Screen Screenshot
· Using
the "PrtScn" Button
· Using
"Win + PrtScn" Shortcut
3. How to Take a
Screenshot of a Specific Area
· Using
"Snipping Tool"
· Using
"Win + Shift + S" Shortcut
4. How to Take a
Screenshot of an Active Window
· Using
"Alt + PrtScn" Shortcut
5. How to Access and Edit
Screenshots
6. Conclusion
1. Introduction
Screenshots are valuable for various purposes, from
capturing important information to sharing visual content with others. With
Windows 10, you have multiple options to take screenshots, depending on your
specific needs. Let's explore these methods step by step.
2. How to Take a Full-Screen Screenshot
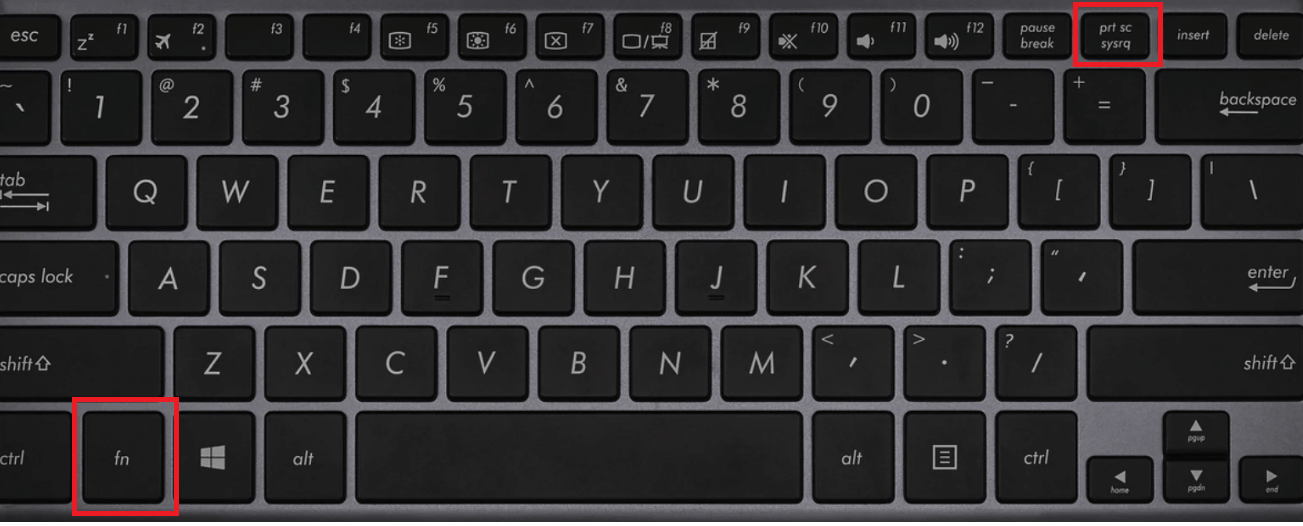
Using the "PrtScn" Button
1. Locate the
"PrtScn" button on your keyboard. It is usually found in the top row,
often combined with other function keys.
2. Press the
"PrtScn" button. This will capture a screenshot of your entire
screen.
3. Open an image editing
program like MS Paint or Microsoft Word, and press "Ctrl + V" or
right-click and select "Paste" to paste the screenshot.
4. Save the image as
desired.
Using "Win + PrtScn" Shortcut
1. Press the
"Win" key and the "PrtScn" key simultaneously. Your screen
will briefly dim to indicate that the screenshot has been taken.
2. The screenshot will be
automatically saved in the "Screenshots" folder within your
"Pictures" library.
3. How to Take a Screenshot of a Specific Area
Using "Snipping Tool"
1. Type "Snipping
Tool" in the Windows search bar and open the application.
2. Click on
"New" in the Snipping Tool window.
3. Drag your cursor to
select the area you want to capture.
4. The screenshot will
open in the Snipping Tool window. Click "File" and select "Save
As" to save the screenshot.
Using "Win + Shift + S" Shortcut
1. Press the
"Win" key, the "Shift" key, and the "S" key
simultaneously.
2. Your screen will dim,
and a selection menu will appear at the top of the screen.
3. Click and drag your
cursor to select the specific area you want to capture.
4. The screenshot will be
copied to the clipboard. Open an image editing program and press "Ctrl +
V" or right-click and select "Paste" to access the screenshot.
Save it as needed.
4. How to Take a Screenshot of an Active Window
Using "Alt + PrtScn" Shortcut
1. Make sure the window
you want to capture is active and visible.
2. Press the
"Alt" key and the "PrtScn" key simultaneously.
3. The screenshot of the
active window will be copied to the clipboard.
4. Open an image editing
program and press "Ctrl + V" or right-click and select
"Paste" to access the screenshot. Save it as required.
5. How to Access and Edit Screenshots
To access your saved screenshots, navigate to the
"Pictures" library on your computer and open the
"Screenshots" folder. From there, you can view, edit, and share your
captured screenshots.
6. Conclusion
Taking screenshots on a Windows 10 PC or laptop is a simple
and valuable skill. Whether you need to capture the entire screen, a specific
area, or an active window, Windows 10 provides various methods to meet your
requirements. By using the "PrtScn" button, the "Win +
PrtScn" shortcut, the "Snipping Tool," or the "Win + Shift
+ S" shortcut, you can easily capture and save screenshots for different
purposes. Happy screen capturing!
Taking a screen capture on your Windows PC is a helpful
component. It tends to be useful for record-keeping and catching the screen to
impart to others. You can likewise utilize it to feature any product blunder or
mess you have encountered.
On the off chance that you are taking screen captures on a
PC or a PC, you are not simply restricted to utilizing the Print Screen key.
There are a lot more simple methods for doing such. Additionally, You can
likewise transfer your screen captures to Google Drive or OneDrive, send them
as email connections, or offer to utilize Skype, Facebook, and WhatsApp.
The most effective method to take a Screenshot
Strategies 1: Print Screen
You simply have to press the Print Screen key, which is
additionally marked as PrtScn, to catch your whole screen. This screen capture
won't be saved as a document, it will be simply replicated to the clipboard.
Consequently, you want to open and glue it into picture-altering programming
like Microsoft Paint and save the record.
Technique 2: Snipping Tool
The Snipping instrument is one of the default utilization of
Microsoft Windows. It permits you to portray out some piece or whole picture of
your HP PC screen.
Play out the accompanying moves toward catch and save screen
capture utilizing the cutting instrument:
Stage 1) Launching cutting instrument
Press the beginning button and type cutting instrument
Click on the Snipping Tool application
Stage 2) The accompanying screen will be shown
Click on "New" to take a screen capture.
Stage 3) Select the region you want to get a screen.
The chosen region will be shown in the clipping apparatus as
follows:
Stage 4) Saving screen capture.
You can save caught screen captures by squeezing Ctrl + S.
It should likewise be possible by playing out the
accompanying advances:
Click on the "Document" menu
Click on "Save As"
Stage 5) Choose the area to save the screen capture
Pick an area to save the screen capture
Click on the "Save" button
Strategy 3: Snagit
Stage 1) Opening the catch window
Go o the notice region by tapping on the bolt.
Click on the Snagit symbol.
Click on the catch button to raise the catch window.
This is material assuming that you as of now have Snagit
proofreader introduced.
Stage 2) Choose your screen catch settings.
The catch window will give you loads of choices on the kind
of screen you like to catch.
You can snatch the whole work area screen, a window, or a
locale with Snagit's All-in-One Capture. It likewise permits you to take a fast
depiction or even record a video.
Stage 3) Click on the Capture button. This will assist you
with snatching a screen that is dynamic.
The screen catches alternate ways that can be changed by
entering the worldwide hotkey underneath the Capture button.
Stage 4) Select the area by clicking and hauling your mouse.
You can likewise do exactly the same thing by squeezing the PrtScn button on
the console.
Technique 4: Snip and Sketch
Clip and Sketch is a screen capture device that can be
utilized to explain and share screen captures. This program is not difficult to
utilize contrasted with the old clipping device that accompanies Windows OS.
You can open the Snip and Sketch application by squeezing
the Windows key + Shift + S on your console. Your PC screen will turn somewhat
more obscure. From that point onward, you simply have to choose the part of
your screen you need to catch and open any picture proofreader instrument, glue
the screen capture and save it. This apparatus can likewise be effortlessly
tracked down in the beginning menu and the notice region.
Technique: 5 Windows Key + Print Screen
You can likewise take a screen capture by squeezing Windows
Key and Print Screen together to save the whole PC screen as a picture. To find
your screen capture, you want to go to pictures, and afterward a subfolder
called "Screen captures".
Then again, on the off chance that you simply press the
PrtScn button on your console, then it will duplicate the screen to the
clipboard. After this, you really want to glue it into picture proofreader
programming, glue the screen capture and save it.
Here are the moves toward playing out this strategy:
Stage 1) You simply have to utilize a console easy route
Press Windows and PrintScreen keys together on your console.
Stage 2) Your screen will go faint briefly to demonstrate
that the utility is opened. Presently, you simply have to take your screen
capture by choosing the piece of the screen.
Presently, find the My Documents envelope and double tap on
the "Photos" subfolder
Stage 3) Double snap on "Screen captures". Windows
consequently make this organizer.
You can now see that your caught screen capture is saved
inside this envelope.
Strategy: 6 Alt + Print Screen
This is a speedy strategy to take a screen capture of your
dynamic window. You simply need to utilize a console easy route: Alt+ PrtScn
key. This will snap the right now dynamic window and duplicate it to the
clipboard. You will presently have to open a picture manager and glue the
screen capture and save it.
Strategy 7: Xbox Game bar
The Xbox Game bar element of MS Windows can be utilized to
snap screen captures when you are playing any game. You simply have to press
the Windows key and G key together on your console to utilize this usefulness.
You can likewise utilize the default Windows easy route Windows key + Alt +
PrtScn to catch a full-screen capture.
Play out the accompanying moves toward setting your own game
bar console alternate route in your Windows PC or PC:
Stage 1) Opening settings in Windows 10
Click on the Start menu
Click on Settings
Stage 2) Setting window will be shown
Click on the Gaming tab
Stage 3) Go to the left board
Click on the Game bar
Stage 4) The accompanying screen will be shown.
Change alternate ways according to your longing.
Click on the "Save" button to save your console
alternate way.
Stage 5) You likewise need to empower the Game bar from this
settings page by guaranteeing that you have the switch button On "Record
game clasps, screen captures, and broadcast utilizing the Game bar."
Windows Logo + Volume Down for Tablet
In the event that you are utilizing a Microsoft Surface
gadget, you can utilize the actual buttons to take a depiction of the whole
screen. This technique is equivalent to taking a screen capture on some other
tablet or telephone.
You can do this by holding your Windows Logo button given at
the lower part of your screen and the volume down button on the gadget. Your
screen capture will be saved to the Pictures/Screenshots envelope.
The most effective method to explain your screen capture
In the wake of taking a screen capture, at times you might
have to edit the picture or comment on it to feature an issue or step. This can
be handily done utilizing two techniques.
Strategy 1: Paint
This is perhaps the most straightforward strategy. Play out
the accompanying moves toward comment on your Screenshot in MS Paint.
Stage 1) Launching the Paint apparatus
Type paint in the Start menu
Click on the "Paint" application
Stage 3) Open your Screenshot and Click on the text
apparatus
This will empower you to comment on your picture
Stage 4) Click on the part of the picture to clarify.
Type the text you need to show and save the screen capture
Technique 2: Snagit
Play out the accompanying moves toward clarifying your
Screenshot in Snagit:
Stage 1) Launching Snagit
Type Snagit in the Start menu
Click on "Snagit Editor"
Stage 2) Click on the callout
This will assist you with adding text and featuring the part
Stage 3) Click on the part of the picture to add a callout
Type the text you need to show.
How to share your screen capture?
Screen capture sharing is a significant undertaking at work
that assists you with giving input ease. The commented-on snaps can feature the
product blunder or bugs you have encountered. Along these lines, your HP PC
program issue can be tackled with no problem.
Technique 1: Upload on the web and offer
You can utilize different web-based devices like Imgur,
Dropbox, Google Drive , and Icedrive. These applications are not difficult to
use as you simply expect to find a screen capture in your Dell PC or PC and
simplified it to the ideal picture-sharing application. Online document
facilitating destinations empower you to get to your depiction from any gadget
anyplace with no issue.
Technique 2: Email
You can utilize free email sending administrations like Yahoo
mail, Gmail, Outlook, Protonmail, and so on, to share your screen capture.
These mail suppliers empower you to consistently send the enormous size of
pictures in mass. You can likewise make them chronicle so you can send
high-goal snaps effortlessly.
Technique 3: Share utilizing Skype, WhatsApp, Facebook
Skype, WhatsApp, and Facebook are free applications that can
be gotten from any gadget. In Skype and WhatsApp, you can send pictures as
connections with the message. Facebook is a virtual entertainment site that
empowers you to send a screen capture as a post. Notwithstanding, these
pictures will be shown to every one of your companions on this site. All things
being equal, you can utilize Messenger to send your snaps to an individual.
Recording your screen on Windows utilizing Snagit
Recording your screen on Windows utilizing Snagit is
straightforward as catching a screen capture.
Stage 1) Opening the Capture window
Go to the notice region by tapping on the bolt
Click on the Snagit symbol
Click on the catch button to raise the catch window.
This is relevant provided that you as of now have the Snagit
supervisor introduced.
Stage 2) Perform the accompanying moves toward recording
your ongoing Dell PC screen:
Click on the "Video" symbol
Click on the "Catch" button
Stage 3) Select the locale by clicking and hauling your
mouse.
Stage 4) Click on the symbol.
This will record your video of the chosen screen. Hang tight
briefly. It will likewise record your mouse development.
Stage 5) Click on the symbol to save your keep in GIF or
PNG. You can likewise save this recording as MP4
FAQ:
What is the most ideal way to catch a Windows 10 screen?
The best and least demanding method for catching a Windows
10 screen is the Print Screen key. This should be possible by simply squeezing
the PrtScn button given on the upper right half of the console, opening MS
Paint, gluing the screen capture, and saving it.
Which elements would it be a good idea for you to consider
while choosing the best screen catch device?
Usability
Altering capabilities
Screengrab choice
Permit cost if relevant
Equipment/programming necessities of the screen catch device
Backing and updating strategy of the screen catch apparatus
Audits of the organization
How would you take a looking over window screen capture?
Snagit is an exceptionally simple device to take a screen
capture from your Dell PC:
Play out the accompanying moves toward catching a depiction
in Snagit:
Stage 1) Open Snagit and Navigate to the "Across the
board" tab.
Stage 2) Click on the "Catch" button.
Stage 3) Click on the yellow-shaded bolts relying upon the
course you like to parchment and save the screen capture
What program might you at any point use to see, alter, or
take pictures?
You can utilize IrfanView, ACDSee Ultimate, MS Paint, Adobe
Photoshop, CorelDraw, and so on, devices to see, alter, or take pictures.
How might you print a screen capture?
Here are the moves toward printing a screen capture:
Stage 1) Take a screen capture of your ongoing window by
squeezing the "Windows" and "PrtScn" buttons on the
console.
Stage 2) Open the "Photos/Screenshots" organizer
on your PC/PC.
Stage 3) Open the Screenshot and Navigate the File Menu and afterward click "Print" or press Ctrl+P
Click Here
Take More! |
Tags:
how to take screenshot on windows 10how to take screenshot on windows 10 laptophow to take screenshot on windows 10 hp laptophow to take screenshot on windows 10 dell laptophow to take screenshot on windows 10 prohow to take screenshot on windows 10 computerhow to take screenshot on windows 10 minecrafthow to take screenshot on windows 10 dellhow to take screenshot on windows 10 lenovo laptophow to take screenshot on windows 10 without keyboardhow to take screenshot on windows 10 reddithow to take screenshot on windows 10 asus laptophow to take screenshot on windows 10 and save ithow to take screenshot on windows 10 and pastehow to take screenshot on windows 10 and crophow to take a screenshot on windows 10 acer laptophow to take a screenshot on windows 10 alienwarehow to take a screenshot on windows 10how to take a screenshot on windows 10 2020how to take screenshot on acer laptop windows 10how to take a screenshot on hp laptop windows 10how to take a screenshot on google chrome windows 10how to take a scrolling screenshot on windows 10youtube how to take a screenshot on windows 10how to take a cropped screenshot on windows 10how to take screenshot on windows 10 browserhow to take screenshot on windows 10 by defaulthow to take screenshot on windows 10 bootcamphow to take screenshot on windows 10 bookhow to take screenshot on windows 10 blue screenhow to take screenshot on windows 10 bluetoothhow to take screenshot on windows 10 bootable usbhow to take screenshot on windows 10 bootable pendrivehow to take screenshot on windows 10 bloatwarehow to take screenshot on mac bootcamp windows 10how to take a screenshot on windows 10 for beginnershow do you take screenshot windows 10how to take a screenshot on windows 10 google chromehow to take a screenshot on windows 10 with cursorhow to take a continuous screenshot on windows 10how to take screenshot in windows 10 dell computerhow to take screen clipping on windows 10how can i take screenshot on windows 10how to take clear screenshots windows 10how to screenshot on windows 10 dell computerhow to take screenshot on computer windows 10how to take a screenshot on your computer windows 10how to take a controlled screenshot on windows 10what is the shortcut to take screenshot in windows 10how to take screenshot on windows 10 desktophow to take screenshot in windows 10 dell desktophow to screenshot on windows 10 dell desktophow to take a screenshot on discord windows 10how to remove duplicate screen on windows 10how to use duplicate screen on windows 10how to use dual screen on windows 10how to take a screenshot on dell windows 10how to take screenshot on desktop windows 10how to take a screenshot on windows 10 hp desktophow to take drag screenshot on windows 10how to take screenshot on windows 10 enterprisehow to take screenshot on windows 10 hp envyhow to take a screenshot on windows 10 hp elitebookhow to take a screenshot on minecraft windows 10 editionhow to take screenshot in laptop windows 10 hp elitebookhow to take extended screenshot windows 10how to use extend screen on windows 10how to use green screen on windows 10 video editorhow to screenshot on windows 10 and edithow to record screen on windows 10 enterprisehow to take a screenshot on hp envy windows 10how to take a screenshot on windows 10 enterprisehow to take screenshot on windows 10 easyhow to take screenshot in pc windows 10 shortcut keyhow to take screenshot on windows 10 full screenhow to take full page screenshot on windows 10how to take screenshot from windows 10how to make full screen on windows 10how to record screen on windows 10 freehow to cast screen on windows 10 from androidhow to fix screenshot on windows 10how to make something full screen on windows 10how to find screenshot on windows 10how to make game full screen on windows 10how to take screenshot on fujitsu laptop windows 10how to take a full screen screenshot on windows 10how to take a screenshot on firefox windows 10which f key takes a screenshothow to do screenshot with windows 10how to take screenshot on windows 10 german keyboardhow to take a screenshot on windows 10 in gamehow to screenshot on windows 10 german keyboardhow to take screen grab on windows 10how to use green screen on windows 10how to record screen on windows 10 game barhow to take gif screenshot in windows 10how to take a screenshot on windows 10 german keyboardhow do i get to my screenshot settingshow to pull up screenshots on windowshow to screenshot with windows buttonhow to take screenshot on windows 10 homehow to take hd screenshots on windows 10how to screenshot on windows 10 hotkeyhow to screenshot on pc windows 10 hphow to split screen on windows 10 horizontallyhow to rotate screen on windows 10 hp laptophow to record screen on windows 10 hp laptophow to take screenshot on windows 10 60 keyboardhow to take screenshot on windows 10 youtubehow to take screenshot on windows 10 in laptophow to take screenshot on windows 10 in hindihow to take instant screenshot on windows 10how to take screenshot in windows 10 hp laptophow to take screenshot in windows 10 dell laptophow to take screenshot in windows 10 lenovo laptophow to take screenshot in windows 10 asus laptophow to take screenshot on laptop in windows 10how to take screenshot in windows 10 on machow to take screenshot on windows 10 javahow to take screenshot on windows 10 japanese keyboardhow to take screenshot on windows 10 japanesehow to take screenshot on windows 10 junk fileshow to take screenshot on windows 10 java editionhow to take screenshot on windows 10 john the ripperhow to take screenshot on windows 10 jailbreakhow to take screenshot on windows 10 jdkhow to take screenshot on windows 10 javascripthow to take screenshot on windows 10 jenkinshow to take screenshot with keyboard windows 10how to take screenshot windows shortcuthow to screenshot on windows 10 with keyboardhow to take screenshot on windows 10 keyboardhow to take screenshot on windows 10 spanish keyboardhow to take screenshot on windows 10 using mac keyboardhow to get screen keyboard on windows 10how to screenshot on windows 10 60 keyboardhow to screenshot on pc windows 10 keyboardhow to take screenshot on windows 10 shortcut keywhat is the shortcut key to take screenshothow to take screenshot on windows 10 laptop hphow to take print screen on windows 10 laptophow to take long screenshot on windows 10how to take a screenshot on windows 10 toshiba laptophow to take screenshot on laptop windows 10how to take screenshot on toshiba laptop windows 10how to take screenshot on hp probook laptop windows 10how to take a screenshot on samsung laptop windows 10how to take screenshot on windows 10 machow to take screenshot on windows 10 tablet modehow to take multiple screenshots on windows 10how to screenshot on windows 10 machow to screenshot on windows 10 mac keyboardhow to take a screenshot on my windows 10 laptophow to screenshot on windows 10 on macbook prohow to do screen mirroring on windows 10how to take a screenshot on my computer windows 10how to take a screenshot on minecraft windows 10how to take screenshot on windows 10 with mousehow to take a screenshot on windows 10 msihow to take screenshot on windows 10 not workinghow to take screenshot on windows 10 notebookhow to take screenshot on windows 10 nowhow to take screenshot on windows 10 new tabhow to take screenshot on windows 10 new windowhow to take screenshot on windows 10 networkhow to take screenshot on windows 10 not syncinghow to take screenshot on windows 10 numberhow to take screenshot on windows 10 new pchow to take screenshot on windows 10 network discoveryhow to take screenshot on windows 10 on machow to take screenshot on windows 10 on laptophow to take screenshot on windows 10 on 60 keyboardhow to take video of screen on windows 10how to record screen on windows 10 obshow to record screen on windows 10 onlinehow to take screenshot of pdf in windows 10how to take screenshot on laptop on windows 10how to take screenshot on windows 10 pchow to take a screenshot on windows 10 without prtscnhow to take partial screenshot on windows 10how to take a screenshot on windows 10 hp pavilionhow to take screenshot on windows 10 dell pchow to capture partial screen on windows 10ways to screenshot on windows 10how to take screenshot on pc windows 10how to take a screenshot on dell pc windows 10how to take screenshot on hp pc windows 10how to take a partial screenshot on windows 10how to take a screenshot on hp pavilion windows 10how to take a screenshot on windows 10 surface prohow to take a quick screenshot on windows 10how to take high quality screenshots on windows 10how to take quick screenshots on pchow to take screen record on windows 10how to take a high resolution screenshot on windows 10how to do screen recording on windows 10 with audiohow to capture screen recording on windows 10how to screenshot windows 10 remote desktophow to make roblox full screen on windows 10how to take a screenshot on roblox windows 10how to take rectangular screenshot on windows 10how to take a screenshot on windows 10 redditwho to take screenshot on windows 10how to take screenshot on windows 10 systemhow to take scrolling screenshot on windows 10how to do split screen on windows 10how to remove screen saver on windows 10how to make screen smaller on windows 10how to save screenshot on windows 10how to snip screenshot on windows 10how to take small screenshot on windows 10how to take screenshot on windows 10 snipping toolhow to take the screenshot on windows 10how to capture the screen on windows 10how to split screen on windows 10 two monitorshow to remove the lock screen on windows 10how to remove the login screen on windows 10how to do the split screen on windows 10how to to take a screenshot on windows 10how to take screenshot on lenovo thinkpad windows 10how to take screenshot on windows 10 using keyboardhow to take screenshot in windows 10 using snipping toolhow to take screenshot using windows 10how to record screen on windows 10 using xboxhow to record screen on windows 10 using vlcunable to take screenshot on windows 10how to take screenshot on windows 10 using mousehow to take screenshot on windows 10 videohow to capture screen on windows 10 videohow to take screenshot in laptop windows 10 videohow to record screen on windows 10 vlchow to split screen on windows 10 videohow to take a screenshot on sony vaio windows 10how to take vertical screenshot in windows 10how to view screenshot on windows 10how to take screenshot on windows 10 without snipping toolhow to take screenshot on windows 10 with keyboardhow to take screenshot with windows 10how to get on-screen keyboard windows 10 without keyboardhow to record screen on windows 10 without xboxhow to record screen on windows 10 with audiohow to take screenshot on windows 10 x 10how to take screenshot on windows 10 xphow to take screenshot on windows 10 x 12how to take screenshot on windows 10 xboxhow to take screenshot on windows 10 xbox game barhow to take screenshot on windows 10 xampphow to take screenshot on windows 10 xcodehow to take screenshot on windows 10 xenderhow to take screenshot on windows 10 xp gameshow to take screenshot on windows 10 xbox controllerhow to take a screenshot on windows 10 xboxwhere to find my screenshot on windows 10how to take screenshot in computer without using print screenhow to take cropped screenshot on windows 10how to take a screenshot on your laptop windows 10how to you take a screenshot on windows 10how to take a screenshot on your windows 10what button to screenshot on pcwhat button is it to take a screenshot on pchow to take screenshot on windows 10 zoomhow to take screenshot on windows 10 zshhow to take screenshot on windows 10 zip filehow to take screenshot on windows 10 zoom meetinghow to take screenshot on windows 10 ziphow to take screenshot on windows 10 zoom camerahow to take screenshot on windows 10 zonehow to take screenshot on windows 10 zoom backgroundhow to take screenshot on windows 10 0xhow to take screenshot on windows 10 0x1how to take screenshot on windows 10 07how to take screenshot on windows 10 0xc00007b errorhow to take screenshot on windows 10 11how to take screenshot on windows 10 10how to take screenshot on windows 10 1909how to take screenshot on windows 10 1803how to take a screenshot on windows 10 2021how to take a screenshot on windows 10 2024-25how to take screenshot on windows 10 32 bithow to take screenshot on windows 10 3dhow to take screenshot on windows 10 3d objects folderhow to take screenshot on windows 10 365how to take screenshot on windows 10 3 workhow to take screenshot on windows 10 365 accounthow to take screenshot on windows 10 3.9how to take screenshot on windows 10 3utoolshow to take screenshot on windows 10 3 monitorshow to take screenshot on windows 10 3.5how to take screenshot for windows 10how to take screenshot on windows 10 surface pro 4how to screenshot area on windows 10how to take screenshot on windows 10 50how to take screenshot on windows 10 512gbhow to take screenshot on windows 10 5 fullhow to take screenshot on windows 10 5kplayerhow to take screenshot on windows 10 5.1how to take screenshot on windows 10 5ghz wifihow to take screenshot on windows 10 5g wifihow to take screenshot on windows 10 5.7how to take screenshot on windows 10 500 driverhow to take long screenshot in pc windows 10how to screenshot on windows 6how to capture screen on windows 10how to take screenshot on windows 10 8gbhow to take screenshot on windows 10 8 9how to take screenshot on windows 10 8.1how to take screenshot on windows 10 802.1xhow to take screenshot on windows 10 80how to take screenshot on windows 10 8.2how to take screenshot on windows 10 90how to take screenshot on windows 10 9 11how to take screenshot on windows 10 98how to take screenshot on windows 10 95how to take screenshot on windows 10 98 themehow to take screenshot on windows 10 95 themehow to take screenshot on windows 10 90 degreeshow to take screenshot on windows 10 9.0chow to take screenshot on windows 10 9.4how to take screenshot on windows 10 911 vpn
Mahatma Gandhi University

MATS University

Kalinga University

Vinayaka Missions Sikkim University

Sabarmati University

Arni University

Capital University

Glocal University

Himalayan Garhwal University

Sikkim Professional University